01 A Trap That Almost All Legacy Products Create
They still work. They still solve a real business problem. But over time, the product around them changes faster than the codebase can keep up. New requirements pile up. Integration points multiply. The original architecture starts fighting every meaningful change. And eventually, you reach a point where continuing to evolve the existing application no longer makes sense costs-wise.
This article offers a practical guide for turning a legacy product into something modern without losing the business value already embedded in it. To make it more concrete, I’ll walk you through a very basic example – an in-house service I rebuilt solo over a few evenings with the right setup.
The product was an internal HR service built with Next.js for assessing engineering competencies. It was doing its job, but the product had outgrown the implementation. We wanted new functionality, a more modern stack, deeper automation, and tighter integration with other internal systems. At that point, this was no longer a refactor. It was a rebuild.
The important part was that the business goal had not changed.
We still needed to support the same core assessment journey. And we absolutely did not want to lose the product knowledge already embedded in the old system – knowledge we built up over time and invested real effort into.
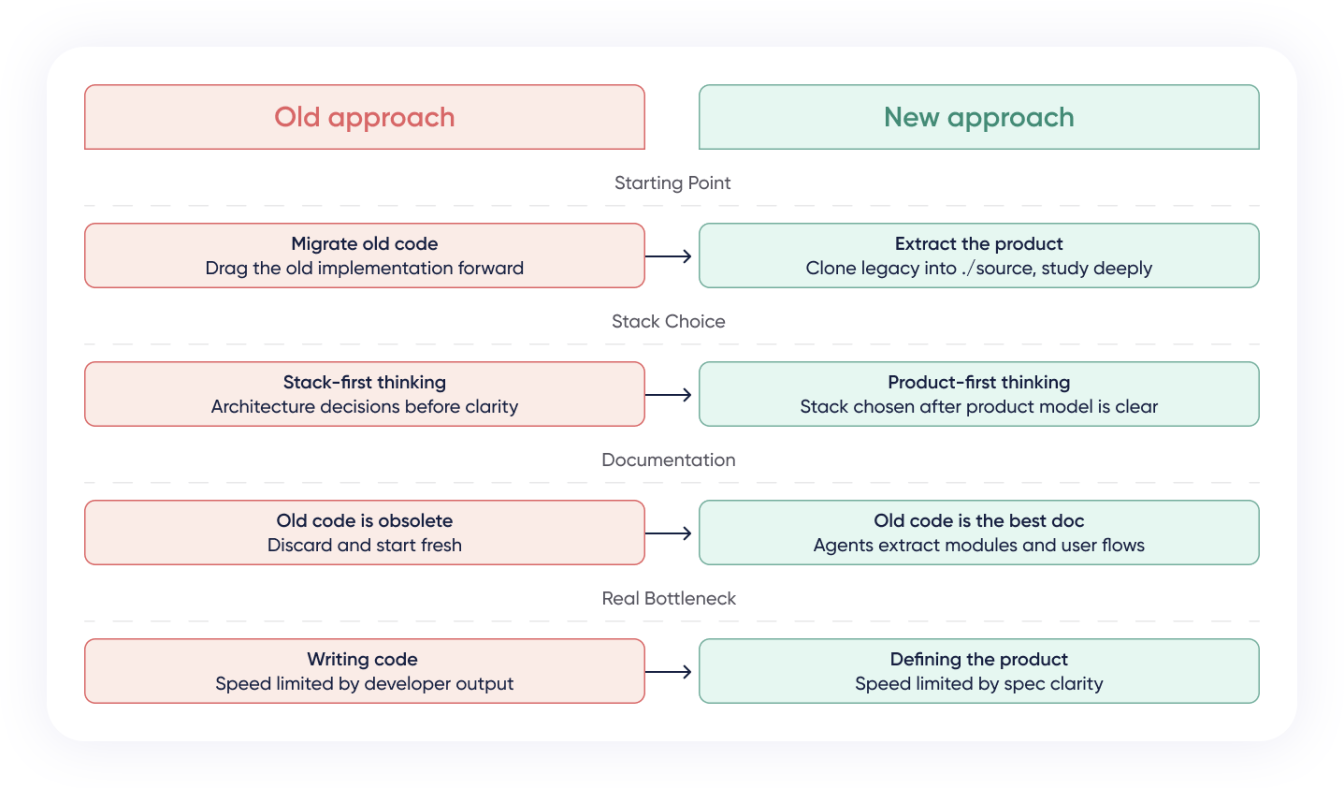
So instead of starting from code migration, I started from product extraction.

02 Step 1: Treat the Legacy App as a Source of Business Truth
The first thing I did was clone the old project into a ./source folder inside a new repository. I called it source on purpose. I did not want to treat it as obsolete and throw it away. For me, it was still a valuable source of product knowledge that we had invested real effort into.
Claude Code is usually my main working environment, and that was true for this project as well.
I launched Claude Code with a prompt asking it to spin up a team of agents and study the product in depth – not as a code-migration exercise, but as a product-discovery exercise. I wanted those agents to work through the system in parallel and extract a clear functional picture of the product while deliberately ignoring technical implementation details.
I was not looking for a rewrite plan or advice on frameworks. I wanted Claude Code to break the system into logical modules, explain what problem it solves, how the user journey works, what is important to save, and how all of it connects to the rest of the system. What each form, API endpoint, and backend flow means from a product perspective.
That included areas such as authentication and authorization, permissions, competencies, assessment creation, peer selection, interviews, finalization, and dashboards. I also asked it to save the output into /source/docs.
Roughly twenty minutes later, Claude Code had produced a structured report for each module, along with a map of how they interacted.
The first key insight: When you are rebuilding a legacy product, the old codebase is not just code. With Claude Code, it becomes a source of product knowledge – often the best documentation you have.
03 Step 2: Turn Product Understanding into Product Decisions
The next step was the most demanding.
I launched another prompt and made Claude Code interview me, module by module, about the changes I need to implement in the new product. This turned into a long but very productive conversation.
Several times, Claude Code helped me realize that some of my initial ideas were not actually improvements. Once we looked more closely at the user flow and trade-offs, it became clear that keeping certain behavior as-is was the more sensible choice.
This was probably the most labor-intensive part of the process. Not because typing was hard – I used voice input, which helped a lot – but because it forced me to think about the product very carefully for several hours.
Claude Code saved all the artifacts from each interview in a newly created ./docs folder as functional requirements for the new product.
By the end of this step, I had something much more valuable than a technical plan: a much better-defined product.
04 Step 3: Validate the New Functional Model Before Writing Code
Before moving to the implementation, Claude Code and I walked through the new application model several times.
The goal was simple: Confirm that the new structure would still lead the user to the intended business outcome. In other words, could the functional requirements be followed all the way from the starting point to the problem actually being solved?
That check matters more than people think.
A rebuild fails easily when teams optimize for architecture before they validate the product logic. In our case, the opposite worked well:
- Extract the business model
- Refine the future-state workflows
- Validate the solution path
- And, finally, move into implementation
05 Step 4: Bring In AWOS Once the Product Is Clear
With the product model in place, it was time to add AWOS to the repository and onboard the new product. AWOS is a spec-driven workflow framework for Claude Code that we built at Provectus and now use widely across our projects. Following the AWOS documentation, I started with the /awos:product command, using a prompt, such as:
$ /awos:product use the documents in ./docs as the source of truth \
    for the product definition
Even at this stage, AWOS made me do some real product work: it pushed me to come up with a proper new name for the product. That took more effort than I expected, but it was a useful exercise.
From there, I moved to /awos:roadmap, which turned the product definition into an execution plan. In the end, the rebuilt product was split into three phases and 14 features.
Then, came /awos:architecture, where I had to get more involved again. This was the step where I defined the target stack for the new product and made the key technical choices.
One of my favorite parts comes right after that. Once the architecture is in place, /awos:hire analyzes it, assesses the technical constraints, identifies which specialist coverage is missing, and then suggests or installs the agents, skills, and MCPs needed to actually build the product.
That is a very important idea.
In an agentic workflow, architecture is not just a document. It should also define the expertise to be “installed” in the environment.
This is where AWOS really connects architecture to execution: You are not just documenting what you want to build – you are preparing Claude Code with the right experts to build it.
06 Step 5: Adapt the Workflow to Your Team’s Needs
Adaptability is part of AWOS philosophy, not an afterthought. It is designed to be shaped around your workflow, conventions, and team practices while keeping the overall spec-driven structure intact.
I made one small but important change to ./claude/commands/awos/spec: I told it to treat the ./docs folder as the primary source of truth and only ask me follow-up questions if something was still unclear.
That worked very well. Clarifications still happened, but they were relevant and specific. And the resulting specs stayed functional rather than drifting into premature technical detail.
/awos:tech and /awos:tasks were pretty much straightforward after that.
One important detail about /awos:tasks is that it does not just produce a task list. It first breaks the feature down into pieces and then breaks those pieces into concrete tasks, and AWOS assigns an agent to each task. Each piece includes its own verification step.
That is exactly why I strongly recommend creating a QA-oriented agent early. If you want the verification step to be meaningful, you need a QA agent that AWOS can assign to those tasks. I, for instance, created a very simple QA agent with instructions like:
- Verify that other agents complete tasks exactly as requested
- Make sure the application is runnable
- Check work using Playwright MCP and curl
- If problems are found, return the task to the assigned agent for fixes
It was intentionally simple, but very useful
07 Step 6: Let Implementation Run While You Work on the Next Spec
This is where the workflow became extremely effective.
I would run something like:
$ /awos:implement all tasks from spec 001
While Claude Code was driving the implementation, I would move on to the next feature and continue writing or refining specs.
That completely changed the rhythm of the work. Instead of staying locked inside one feature from start to finish, I could remain in product-thinking mode while implementation kept moving forward. During one implementation cycle, I could usually prepare two or three additional specs, drink tea, and enjoy life a little.
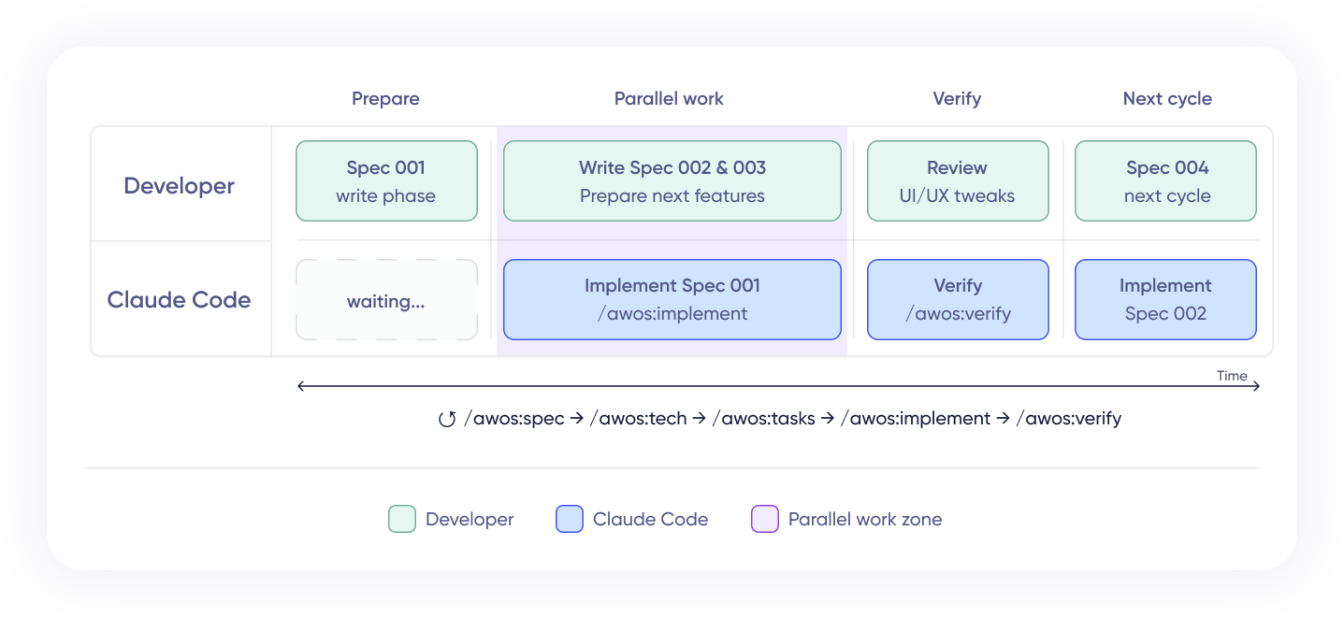
That may sound not that significant, but it actually changes the economics of development with AI agents. The more clearly you separate product thinking, technical planning and execution, the more leverage you get from the system.
Once a feature was implemented, I still reviewed it myself. Most of my tweaks were UI and UX changes rather than core logic.
Then, I would run /awos:verify to check the implementation against the spec documents. If something had changed along the way, it would point out which documents needed to be updated and even suggest the prompt to do it. That helped keep the implementation and the written context aligned.
And then the cycle would start again:
/awos:spec -> /awos:tech -> /awos:tasks -> /awos:implement → /awos:verify
That is what made the whole workflow feel so effective. Once the system was set up, I could keep moving through the same structured loop, feature by feature.
08 Why This Workflow Works
The point of this process is not to preserve old code. It is to preserve product understanding. That is why this workflow works. Claude Code gave me speed, depth, and an unprecedented level of diligence. AWOS gave that work structure, repeatability, and a delivery loop I could reuse feature after feature.
If you already have a product that still solves the right problem, you do not always need to drag the old implementation into the future. Sometimes the better path is to extract the product from the existing system, define the next version clearly, and rebuild it in a much more deliberate way.
You may have noticed that I said almost nothing here about the target technical stack. That was intentional. In the current environment, the stack matters far less than many teams still think.
Once you have strong functional specs, you can implement the same product on almost any modern stack. The real bottleneck is no longer writing code. It is defining the product clearly enough that implementation can move with confidence.
So if you have your own wild legacy jungle to deal with, try this approach. It is a very practical way to turn that old beast into something modern without losing the product knowledge inside it.
Ready to modernize legacy products with Claude Code? Learn more about how Provectus can help!